Multi-grid window deformation algorithm tutorial
[6]:
# import packages
[7]:
from openpiv import windef  # <---- see windef.py for details
from openpiv import tools, scaling, validation, filters, preprocess
import openpiv.pyprocess as process
from openpiv import pyprocess
import numpy as np
import pathlib
import importlib_resources
from time import time
import warnings


import matplotlib.pyplot as plt
%matplotlib inline
Set up all the settings:
- where the images are
- where to save the results
- names of the image files
- what is the region of interest
- do you apply dynamic masking or a masking image
- what kind of correlation to apply: circular vs linear
- interrogation window sizes, overlap sizes, number of iterations
- time interval, interpolation options, etc.
Read the tutorial by Theo Kaufer with all the details. See windef.py for more code details
[8]:
settings = windef.PIVSettings()

path = importlib_resources.files('openpiv')

'Data related settings'
# Folder with the images to process
settings.filepath_images = path / 'data' / 'test1'  # type: ignore
# Folder for the outputs
settings.save_path = path / 'data' / 'test1'  # type: ignore
# Root name of the output Folder for Result Files
settings.save_folder_suffix = 'Test_1'
# Format and Image Sequence (see below for more options)
settings.frame_pattern_a = 'exp1_001_a.bmp'
settings.frame_pattern_b = 'exp1_001_b.bmp'

# or if you have a sequence:
# settings.frame_pattern_a = '000*.tif'
# settings.frame_pattern_b = '(1+2),(2+3)'
# settings.frame_pattern_b = '(1+3),(2+4)'
# settings.frame_pattern_b = '(1+2),(3+4)'

'Region of interest'
# (50,300,50,300) #Region of interest: (xmin,xmax,ymin,ymax) or 'full' for full image
settings.roi = 'full'

'Image preprocessing'
# 'None' for no masking, 'edges' for edges masking, 'intensity' for intensity masking
# WARNING: This part is under development so better not to use MASKS
settings.dynamic_masking_method = 'None'
settings.dynamic_masking_threshold = 0.005
settings.dynamic_masking_filter_size = 7

settings.deformation_method = 'symmetric'

'Processing Parameters'
settings.correlation_method='circular'  # 'circular' or 'linear'
settings.normalized_correlation=False

settings.num_iterations = 2  # select the number of PIV passes
# add the interroagtion window size for each pass.
# For the moment, it should be a power of 2
settings.windowsizes = (64, 32, 16) # if longer than n iteration the rest is ignored
# The overlap of the interroagtion window for each pass.
settings.overlap = (32, 16, 8) # This is 50% overlap
# Has to be a value with base two. In general window size/2 is a good choice.
# methode used for subpixel interpolation: 'gaussian','centroid','parabolic'
settings.subpixel_method = 'gaussian'
# order of the image interpolation for the window deformation
settings.interpolation_order = 3
settings.scaling_factor = 1  # scaling factor pixel/meter
settings.dt = 1  # time between to frames (in seconds)
'Signal to noise ratio options (only for the last pass)'
# It is possible to decide if the S/N should be computed (for the last pass) or not
# settings.extract_sig2noise = True  # 'True' or 'False' (only for the last pass)
# method used to calculate the signal to noise ratio 'peak2peak' or 'peak2mean'
settings.sig2noise_method = 'peak2peak'
# select the width of the masked to masked out pixels next to the main peak
settings.sig2noise_mask = 2
# If extract_sig2noise==False the values in the signal to noise ratio
# output column are set to NaN
'vector validation options'
# choose if you want to do validation of the first pass: True or False
settings.validation_first_pass = True
# only effecting the first pass of the interrogation the following passes
# in the multipass will be validated
'Validation Parameters'
# The validation is done at each iteration based on three filters.
# The first filter is based on the min/max ranges. Observe that these values are defined in
# terms of minimum and maximum displacement in pixel/frames.
settings.min_max_u_disp = (-30, 30)
settings.min_max_v_disp = (-30, 30)
# The second filter is based on the global STD threshold
settings.std_threshold = 7  # threshold of the std validation
# The third filter is the median test (not normalized at the moment)
settings.median_threshold = 3  # threshold of the median validation
# On the last iteration, an additional validation can be done based on the S/N.
settings.median_size=1 #defines the size of the local median
'Validation based on the signal to noise ratio'
# Note: only available when extract_sig2noise==True and only for the last
# pass of the interrogation
# Enable the signal to noise ratio validation. Options: True or False
# settings.do_sig2noise_validation = False # This is time consuming
# minmum signal to noise ratio that is need for a valid vector
settings.sig2noise_threshold = 1.2
'Outlier replacement or Smoothing options'
# Replacment options for vectors which are masked as invalid by the validation
settings.replace_vectors = True # Enable the replacment. Chosse: True or False
settings.smoothn=True #Enables smoothing of the displacemenet field
settings.smoothn_p=0.5 # This is a smoothing parameter
# select a method to replace the outliers: 'localmean', 'disk', 'distance'
settings.filter_method = 'localmean'
# maximum iterations performed to replace the outliers
settings.max_filter_iteration = 4
settings.filter_kernel_size = 2  # kernel size for the localmean method
'Output options'
# Select if you want to save the plotted vectorfield: True or False
settings.save_plot = False
# Choose wether you want to see the vectorfield or not :True or False
settings.show_plot = True
settings.scale_plot = 200  # select a value to scale the quiver plot of the vectorfield
# run the script with the given settings
Run the windef.py function, called piv with these settings
[9]:
windef.piv(settings)
/home/user/Documents/repos/openpiv-python/openpiv/data/test1
exp1_001_a.bmp
True
[PosixPath('/home/user/Documents/repos/openpiv-python/openpiv/data/test1/exp1_001_a.bmp')]
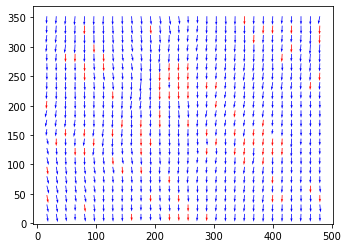
Image Pair 1
exp1_001_a exp1_001_b
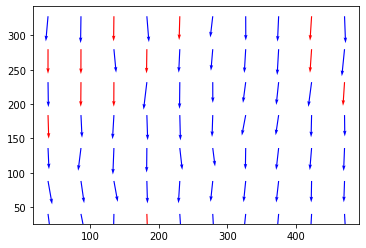
Run the extended search area PIV for comparison
[10]:
# we can run it from any folder
path = settings.filepath_images


frame_a  = tools.imread( path / settings.frame_pattern_a)
frame_b  = tools.imread(  path / settings.frame_pattern_b)

frame_a = (frame_a).astype(np.int32)
frame_b = (frame_b).astype(np.int32)

u, v, sig2noise = process.extended_search_area_piv( frame_a, frame_b, \
    window_size=32, overlap=16, dt=1, search_area_size=64, sig2noise_method='peak2peak' )
x, y = process.get_coordinates( image_size=frame_a.shape,
                               search_area_size=64, overlap=16 )
mask_s2n = validation.sig2noise_val(sig2noise, threshold = 1.3 )
mask_g = validation.global_val( u, v, (-1000, 2000), (-1000, 1000) )
invalid = mask_s2n | mask_g
u, v = filters.replace_outliers( u, v, invalid, method='localmean',
                            max_iter=10, kernel_size=2)
x, y, u, v = scaling.uniform(x, y, u, v, scaling_factor = 1)
x, y, u, v = tools.transform_coordinates(x, y, u, v)
tools.save(x, y, u, v, invalid, 'test1.vec')
tools.display_vector_field('test1.vec', scale=75, width=0.0035);
Options for creating lists of images
Options:
    settings.pattern_a = 'image_*_a.bmp'
    settings.pattern_b = 'image_*_b.bmp'

or
    settings.pattern_a = '000*.tif'
    settings.pattern_b = '(1+2),(2+3)'

will create PIV of these pairs: 0001.tif+0002.tif, 0002.tif+0003.tif ...

    settings.pattern_a = '000*.tif'
    settings.pattern_b = '(1+3),(2+4)'

will create PIV of these pairs: 0001.tif+0003.tif, 0002.tif+0004.tif ...
or
    settings.pattern_a = '000*.tif'
    settings.pattern_b = '(1+2),(3+4)'

will create PIV of these pairs: 0001.tif+0002.tif, 0003.tif+0004.tif ...